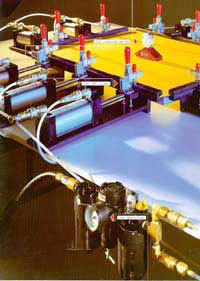
INSTRUCTIONS
1. Place frame on table with a 1 1/2" spacer beneath the frame
so that the frame is 1/4" above the height of bottom jaw of
clamp.
2. Position clamps on all four sides of frame.
3. Cut fabric to size of frame allowing 1 1/2" to 2" overlap
on all sides for clamping,
4. Open all clamps and position fabric over frame with overlap
clamped securely between jaws of clamp.
5 . Pull sleeve valve to let in air in the pull side of systems
(red tubing). Regulate air from regulator for desired tension.
6. Adhere surface. N.B. Placing weights on inside edge of frame
will ensure contact with all the surface of the frame before
gluing.
7. Release all air on this side of system then pull sleeve valve
in air in return system. (black tubing) for clamps to go back
in the front position of clamp.
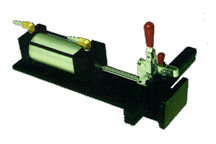
ASSEMBLY INSTRUCTIONS
N.B. All fittings are "push in type" meaning connecting the
tube consists of simply pushing tube completely in fitting.
For removing tube from fitting push in collar of fitting and
at same time pull tube out (may be difficult if there is air
in the system).
1. Hook up filter, regulator, lubricator to table.
2. Connect red tube from manifold to regulator (top sleeve valve)
and place manifold in the middle under the table.
3. Connect from manifold one red tube to every clamp to the
pulling side of clamp.
4. From bottom sleeve connect black tubing to tee and from tee
connect lengths of approximately 9" from clamp to clamp except
for the corners which may vary from 26" to 30".

Screen
Stretching Video
|